Importing Customers from QuickBooks

Contents
Overview
Compared to working with transactions, getting lists in and out of QuickBooks Desktop is pushbutton-simple. With one notable exception: Tax Districts. They're easy enough, just something we have to take care of before we start importing.
When Morning Flight imports an invoice for a new customer into QuickBooks Desktop, it also imports that customer's billing information and tax district. What it doesn't import is the TAX RATE for the district. That's standard relational database practice. Hundreds of customers can have the same tax district, but the rate for that district is stored in a single location outside the QuickBooks Desktop customer file. When it's changed in that single location, the new rate is applied to any new invoice that references that district. Imagine what would happen if the rate was stored embedded with the customer and the County changed the rate and you'd have to look up every single customer affected by the change and update their tax rate individually - it would be a nightmare!
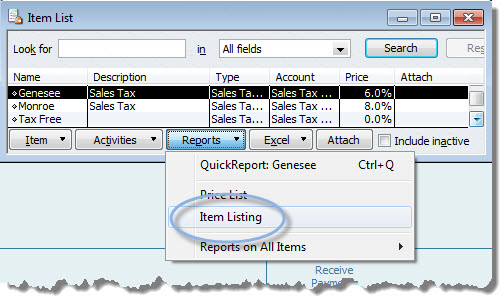
If you have scores of districts to contend with, the quickest way to sync them is to print the QuickBooks item list, then make sure the districts and rates you've set up in Morning Flight are identical to the sales tax items you've set up in QuickBooks.
To print the QuickBooks item list, go to Lists > Item List, then Reports > Item Listing. To view tax items in Morning Flight, go to File > Update Taxes.
The Transfer - Step by Step
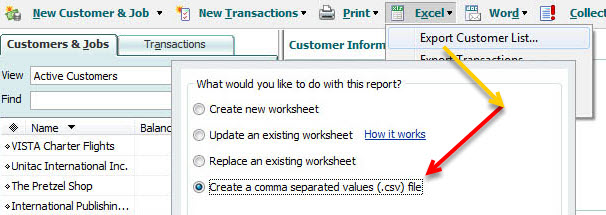
1.Open QuickBooks, then go to Customers > Excel > Export Customer List.
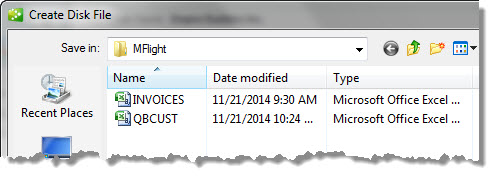
2.When prompted, enter the folder into which you want to export your QuickBooks Desktop customer file (C:\MFlight\QBCUST.CSV by default). Use any drive\folder\file combination that's convenient. If you already have a folder for invoices, no need to create a second one. Use the invoice folder instead.
CAUTION: If you should happen to open the CSV file in Excel, don't update or save it. Close it without saving any changes. Excel has a habit of adding formatting options even when you tell it not to, making the file useless for importing.
3.![]() Open the Flight Engineer (F-11), then go to QuickBooks > Import Customers from QuickBooks.
Open the Flight Engineer (F-11), then go to QuickBooks > Import Customers from QuickBooks.
4.Click the Payment button to enter your most common payment terms.
5.Click the Tax District button and do the same for sales taxes.
![]()
When Morning Flight can't match up an incoming tax district with a tax district in its own database, it defaults to the district you designated as your "most common." That's the district you see below. On average that will work, but it's a double-edged sword. Most of the time is, well, just most of the time. If your QuickBooks tax rates don't match your Morning Flight rates, at some point you're going to get a messed-up invoice.
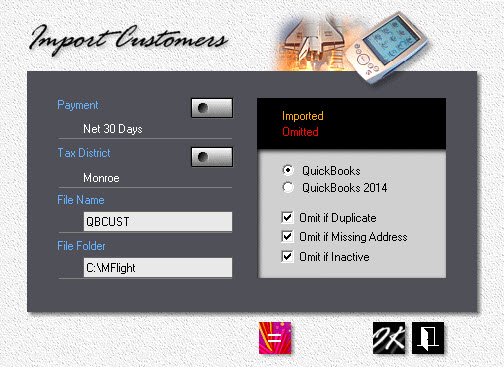
6.Enter the File Name and File Folder for the Excel CSV file you exported from QuickBooks in step 2. It's OK to leave off the CSV file extension when you enter the name.
7.Select your version of QuickBooks - 2013 and earlier, or 2014 and later.
8.Finish up by setting your preference for omissions, then click OK.
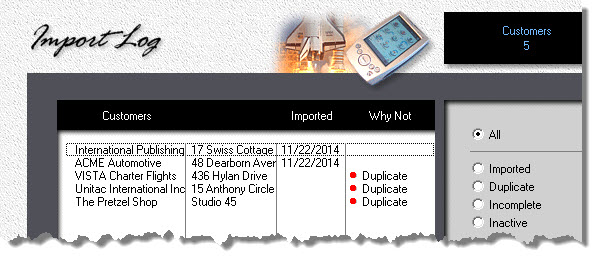
9.![]() When the transfer is complete, click the Import Log button, or go to QuickBooks > View Import Log in the Flight Engineer.
When the transfer is complete, click the Import Log button, or go to QuickBooks > View Import Log in the Flight Engineer.
Preview and Update as you go
During the transfer you'll have a chance to edit customers as they're being imported. I can tell you from experience, the time you set aside for that will be time well spent. Making corrections now is so much quicker and easier than having to go through all your customer records later.
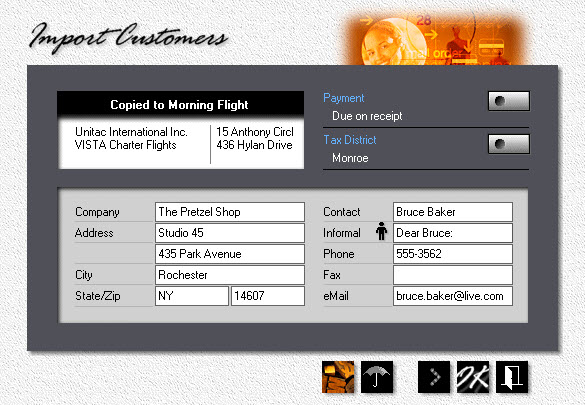
About the buttons: To save the customer on display and bring up the next, click OK. You can bypass a customer by clicking the arrow button, third from the left. To terminate the transfer, click the exit door.
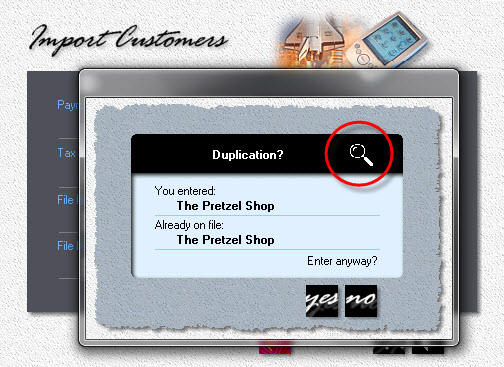
One final note: When you're merging your QuickBooks list with your Morning Flight list, you're going to get duplicates. Enough duplicates sometimes to put you into a loop should the "Omit if Duplicate" box have been left unchecked,. Reject one alert and up pops another.
Here is how to get out: Click the magnifying glass in the alert box. The object is to preview the about to be duplicated customer. Which it will, and you can go on from there. But thankfully you also get an exit door to terminate the transfer - and restart it with the "Omit if Duplicate" box checked this time.